The verdict is in! I didn't get the part...
Well, I got the email from ARS this morning and...I didn't get a place on the design team. Oh well! Won't lie....somewhat disappointed...but how else do you expect to learn if you don't 'fail' once in a while? I say 'fail' because I don't really see it as a failure but right now I have no other words. LoL I am having a rough day and I think I need some serious crafting tonight to put me in a better mood! I have been working on thinking outside of my creative box and one of my projects is waaaaay outside my box! LoL I cannot wait to post it and get some feedback!
For now I will post the two projects I did for the ARS design team application. Hopefully I will have something more tonight or tomorrow. Take care, y'all!
Snow Day L/O --(30 mins)


For now I will post the two projects I did for the ARS design team application. Hopefully I will have something more tonight or tomorrow. Take care, y'all!
Snow Day L/O --(30 mins)


List of Materials:
-5 sheets of cardstock (They should coordinate with colors in your photo. I used Navy Blue, Blue, Dusk Blue, White, and Lime Green)


-2 4x6 photos that are the same (You will need one photo to refer to as you cut up the other for the mosaic effect.)
-1 paper trimmer
-adhesive of choice (I used Mainstays double sided tape and Beacon's Zip Dry glue.)
-pop dots
-white ink pad
-cotton balls
-hot glue gun
-small gems (Viva Decor pens would be perfect as well.)
-8 paper snowflakes
-3 fabric snowflakes (Different sized paper snowflakes are just as good!)
-Gypsy
-font cartridge (I used Cuttin' Up. I will also attach the gypsy file for those who rather use it.)
-Cuttlebug
-3 Cuttlebug embossing folders (I used Seeing Spots as well as the Snowflake and Checkered print folders from the Winter Wonderland 6 folder set.)
-Corner rounder
-tweezers
Instructions
Step 1. Cut one of your photos into 6 (1 in x 4 in) strips. Then cut each strip into 4 (1 in x 1in) squares. [You should end up with 24 (1 in x 1 in) squares altogether.]
Step 2. Cut 24 (1 1/4 in x 1 1/4 in) squares out of the Lime Green cardstock. Using double sided tape, mount the photo squares onto the green squares, one at a time.
Step 3. Mount each of the framed photo squares approximately 1mm from each other on a (8 1/2 in x 6 1/8) piece of Navy Blue cardstock, recreating the photo. [This is when you will need the duplicate folder to refer to.] Round corners.
Step 4. Cut a (12 in x 4 in) strip of Dusk Blue cardstock, a (11 in x 1 in) strip of Lime Green cardstock, and a (10 1/2 in x 1 in) strip of white cardstock. Round corners
Step 5. Mount lime green strip approx. 1/4 in from the bottom of the the dusk blue strip.
Step 6. Using your Cuttlebug and folders, emboss each strip-Seeing Spots folder for the white strip and the checkered pattern folder for the dusk blue with mounted lime green strip.
Step 7. Using attached gypsy file (opened in Cricut Craft Room), cut out the words Snow Day-cut the shadow in Navy Blue and the separate letters in white.Mount the white letters onto the navy Blue shadow layer.
Step 8. Mount your embossed white strip approx. 1/2 of an inch from the top of your Blue cardstock (L/O base) page. Then, mount your dusk blue strip, green strip pointing towards the bottom of your L/O base, approx. 2 inches from the bottom of your page
Step 9. Using your Cuttlebug, emboss the layered words using the Snowflake folder.
Step 10. Ink the edges of your photo with a white ink pad. Then, using a cotton ball pressed into the ink pad, dab white ink over the entirety of the your L/O. This will lighten the boldness of the colors on your L/O to give it a softer tone.
Step 11. Mount photo onto your page approx. 1/4 of an inch from the top of your page. Then mount your words to the bottom of your page.
Step 12. Add your embellishments! (I used a hot glue gun to stick the fabric snowflakes to the page, and pop dots to attach the paper snowflakes. I then attached tiny blue gems to the middle of each snowflake an to my letters using my hot glue gun and tweezers.)
Step 13. (Dare I??) Step back and admire your work! Congratulations on another page completed!
Summer Vacation 2 pg L/O--(30-45 mins)


List of Materials:
-3 photos (Mine are 4x6 inches and 5 1/4 x 3 3/4 inches)
-3 pieces of patterned cardstock or paper, two of which are the same (Mine came from "The Best Of" pack from K&Company, 2 red and 1 Hawaiian print)
-1 piece of blue paper (Mine is also slightly textured which added a nice flair to the watery effect)
-paper trimmer
-Expression
-Gypsy and gypsy cut file (attached)
-pop dots
-adhesive of choice (I used Mainstays double-sided tape)
-a white, pastel blue, and a blue ink pad
-cotton balls
-Star Dust Stickles (Or clear glitter glue)
-journal box stamp (any style will do)
Step 1. Tear the top right and bottom left corners of the red paper into large sections at an diagonal.
Step 2. Adhere the corners to the corresponding corners of one sheet of the Hawaiian. Adhere the larger red piece to the corresponding area of the second piece of Hawaiian.
Step 3. Cut a large rectangle out of the blue paper, making sure there is 1 inch of room all the way around from the edge of the photo to the edge of the blue rectangle. Now tear a 1/4 inch strip all the way around to give it a tiny wave look. To soften the corners, ink them with a pastel colored blue ink.
Step 4. Roll the blue rectangle into a tight roll and let it go. It should now have a severe convex, (middle curling up), curl in it.
Step 5. Dab a cotton ball into some white ink and gently, but firmly, press it onto the middle of curled paper, working in a circular 'feathered' motion moving out from the middle to the top and then from the middle to the bottom of the paper, creating a large arc of color. Repeat the process with a cotton ball dipped into blue ink. (Blue ink should be noticeably darker than the blue paper, but not dark enough to 'paint over' the color of the paper.)
Step 6. Adhere ONLY the BOTTOM of the photo to the blue 'wave' about an inch from the bottom of the 'wave'.
Step 7. Place pop dots along the top part of the photo. Gently pull the photo upwards to make a roll in the blue 'wave', the press down to adhere the pop dots to the paper. There should now be a slight concave, (curling downwards), wave underneath your photo. Adhere matted photo to the bottom left corner of the second page of your L/O.
Step 8. Repeat the process to create a second 'wave' border for your second photo.
Step 9. Adhere ONLY the BOTTOM of your second photo to the second 'wave'. This time, pull your photo up and press down to crease the paper for the concave curl under the photo. However, do NOT adhere the top of your photo to the 'wave'. Allow the natural curve of the 'wave' give your photo some dimension. (It make your photo look as if it is 'riding the wave'.
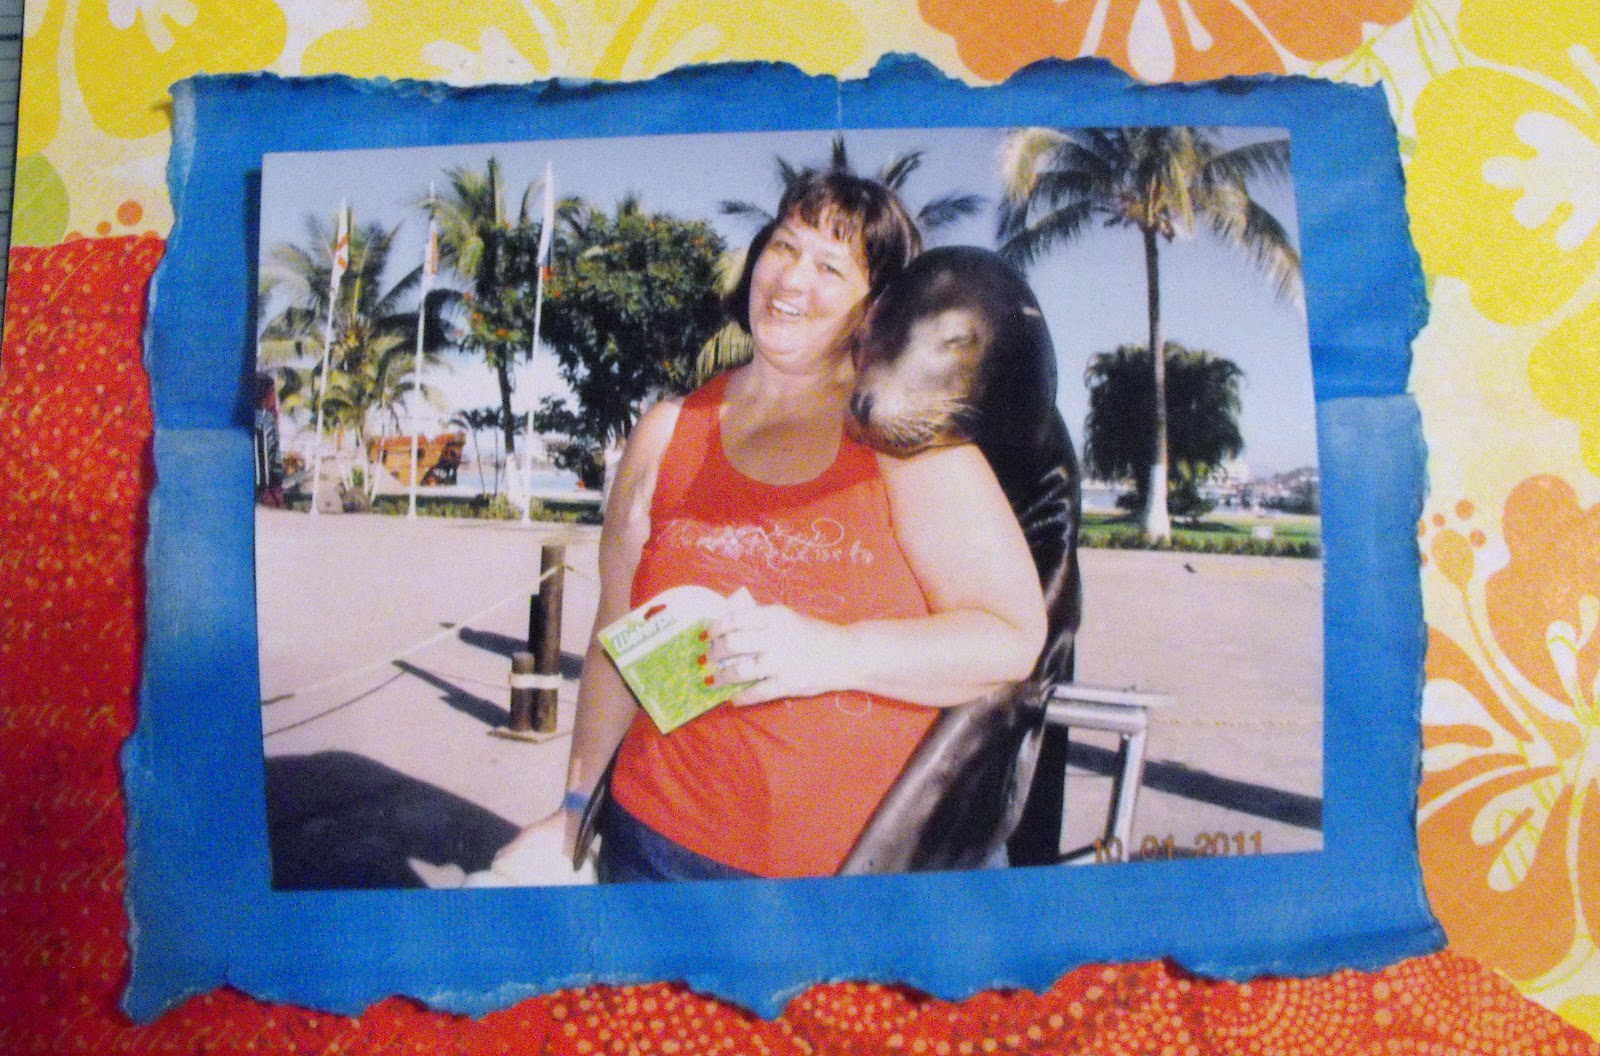
Step 9. Adhere your third photo to the top right hand corner of the first page of your L/O. You can repeat the process for the wave to frame the photo. (I did not have to as my photo already had a blue frame printed around it-which, in fact, inspired the waves to begin with. :)
Step 10. To create your journal box, simply stamp a journal box stamp with blue ink onto a desired size of cardstock. Round corners and adhere to page.
Step 11. Cut a 12 x 2 1/4 inch strip of blue paper. Crumple, yes I said crumple, it up into as tight a ball as you can. Do this a few times to get a lot of creases in the paper and make it more malleable.
Step 12. Using a cotton ball dipped in the blue ink, run it along the length of the strip a few times, pressing gently but firmly. Repeat with white ink, then again with the blue ink. You should find the creases of the paper standing out more from the blue ink.
Step 13. Adhere ONLY the SIDES of the strip to the page, keeping each side approximately 1/4 inch from the age. This should give your strip good dimension and allow it to 'flow' better. Adhere the middle-ish of the strip to the page using a pop dot.
Step 14. Cut out the words 'Summer Vacation' using the gypsy cut file. Gently pass over them with the pastel blue ink.
Step 15. Adhere them to the blue strip with pop dots. To allow the words to 'flow' with the strip, only pop dot the edges of the words, and place one word on each size of the pop dotted middle-ish. (You will only need 1 pop dot for the 'on' from the word 'vacation'.)
Step 16. To make the embellishments, cut three blue 2 x 2 inch squares and one 2 1/2 x 2 1/2 inch square. Crumple each of them up as tight as you can to create the same effect as the blue strip. Tear the edges to form a rounder piece of blue paper.
Step 17. Ink each piece the same as the strip and the photo frames. (Blue, white, blue again.)
Step 18. Roll the edges outward while pressing in on the middle of the embellishment to create a 'splash' like effect. (You can layer them to create a larger dimensional embellishment.)
Step 19. Adhere the larger 'splash' to the top left corner of your journal box using a pop dot. Adhere two of the 'splash'es to the second page using pop dots. Attach the last 'splash' to the bottom right corner of the journal box using non-dimension adhesive.
Step 20. Add some Stickles or glitter glue to the darkened creases of all the 'water' pieces. Add a smooth, thin layer, NOT a 3D layer! This will give your water a sun-kissed look.
Step 21. VOILA! C'est finis! Congratulations on an awesome layout!! Now bask in its tropicalness...ness...ness.
There you go! Let me know what you think! They are not much, I realize, but I don't have much to work with where I live. :P Take care!


Love your Layouts!!! You have a lot of Talent! To bad on not making the Design Team. Thank You for being a follower of mine and for leaving me such nice comments. I have chosen you to receive the Liebster Award! You can go to my blog for more Information. Congratulations!!! :0)
ReplyDeletecindys-greencricut.blogspot.com